
Tutorials › 17
3D rotary finishing: a chess pawn
3D rotary finishing turns a 3D model on the rotary axis: a chess piece, a baluster, a table leg. The model lies along the axis, and a ball nose follows it all the way round as the blank turns. This tutorial cuts NativeCAM's demo pawn from a 1¾ inch poplar blank.
Not tested on a machine. 3D rotary finishing hasn't been cut, or even air-cut, on a real machine. Mach4's G93 feeds and which way Avid's rotary turns are untested too. Before your first cut:
- Time a turn from MDI. With no blank in the chuck and the tool raised, run
G21 G90, thenG93 G01 A360 F10, thenG94. The turn should take exactly 6 seconds (in inverse time, F10 means one tenth of a minute). If it doesn't, stop: the feeds won't be what NativeCAM planned. - Set Turn speed under Rotary Axis to your A motor's velocity (on Mach4: Configure ▸ Control ▸ Motors). It decides how much the cut slows near the axis and how long the job takes (below).
- Air-cut the pawn: File ▸ Export Air Cut…, with Z zeroed on the rotation axis, and watch the whole program.
- For the first real cut, use soft wood, as the demo does: 1¾ inch poplar, rounded to 1.55 inches with the ¼ inch end mill, then finished with the ¼ inch ball nose. Part it off at the stubs by hand.
-
Open the demo, or import a model
Choose File ▸ New Demo Rotary Project (3D). It opens a chess pawn on a round poplar blank 1¾ inches across and 6 inches long, with two toolpaths ready: Round to 1.55" with the ¼ inch end mill, then Finish pawn with the ¼ inch ball nose. It's also in the repository as
examples/Demo Pawn.nativecam, with its G-code.For your own piece, set up a rotary blank (Material ▸ Rotary blank, as in the indexed tutorial) and import the model with ⌘I: STL, OBJ, 3MF or USDZ. Turning an existing job rotary does the same with the models already in it.
-
Place the model on the blank
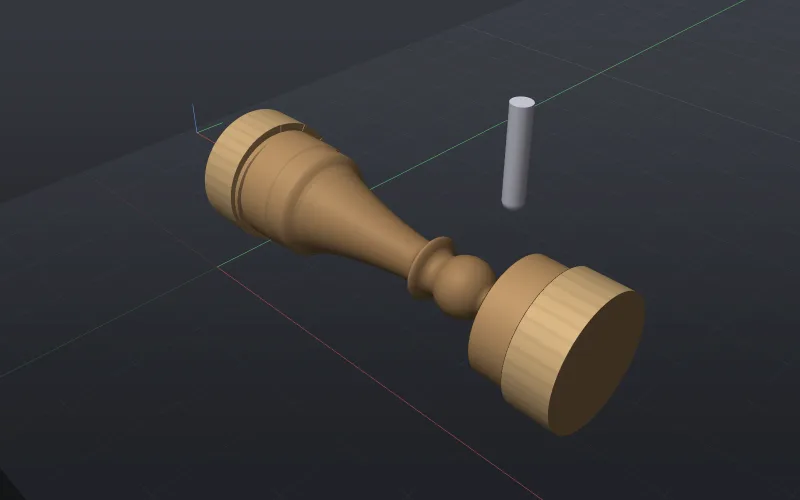
An imported model lies along the rotation axis, centred on it, along its longest axis, scaled to fit the blank and placed in its middle. Select it to adjust it:
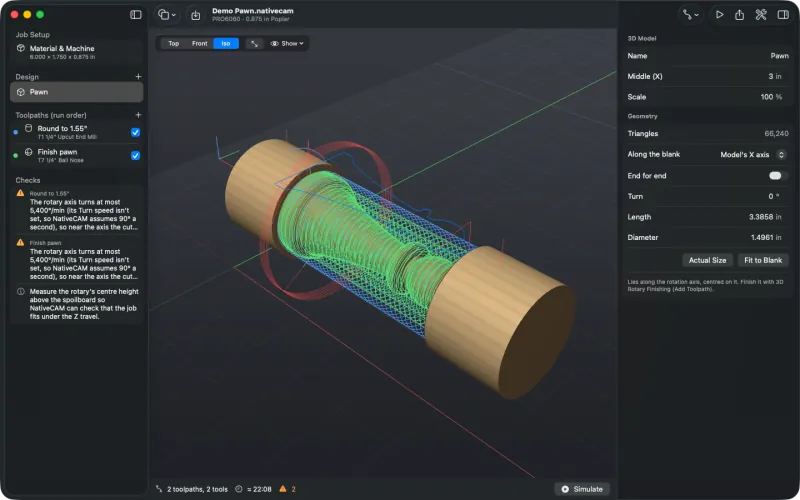
The pawn on the blank, with its toolpaths wrapped round it. - Along the blank picks which of the model's own axes runs along the blank, and End for end turns it round.
- Turn turns it about the axis: which side is on top at A0.
- Length, Diameter and Middle (X) size it and place it along the blank.
- Fit to Blank makes it as wide as the blank is round and no longer than the blank less ½ inch at each end. Actual Size shows it as drawn.
On the canvas the model is drawn from the side, and it only moves along the blank. Leave material at each end: the pawn has a short stub at each end, so it stays held between the chuck and the tailstock until you part it off.
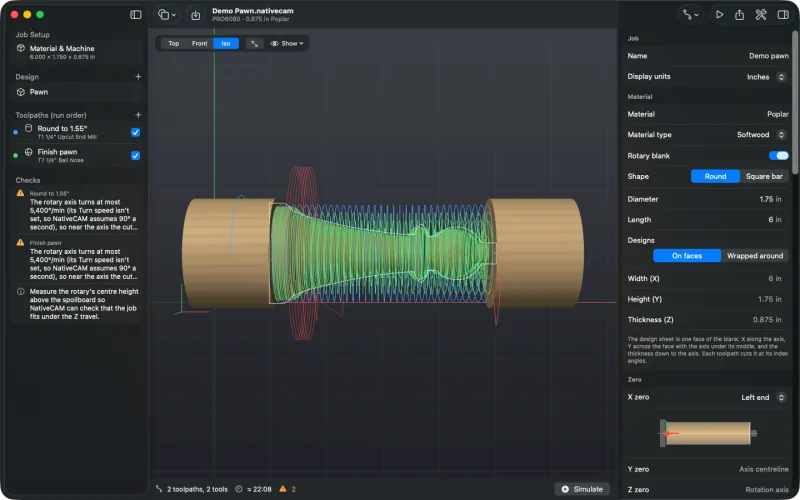
Seen from the side: the pawn's outline on the blank. -
Round it first
There's no 3D rotary roughing yet. Where the model sits deeper below the stock than the finish's pass depth, the finish cuts down in layers first, each following the whole pattern, which is slow. A Rounding toolpath first takes the blank down quickly with an end mill: here to 1.55 inches, just over the pawn's widest point, in about 3 minutes with no turn speed set. On a square bar, a Rounding first is a must, and Checks says so. The rounding tutorial covers its settings.
-
Add the 3D Rotary Finishing toolpath
Select the model and choose Add Toolpath ▸ 3D Rotary Finishing with a ball nose. The demo's uses the ¼ inch ball at 15,000 RPM and 315 in/min, inside the chip-load range for softwood.
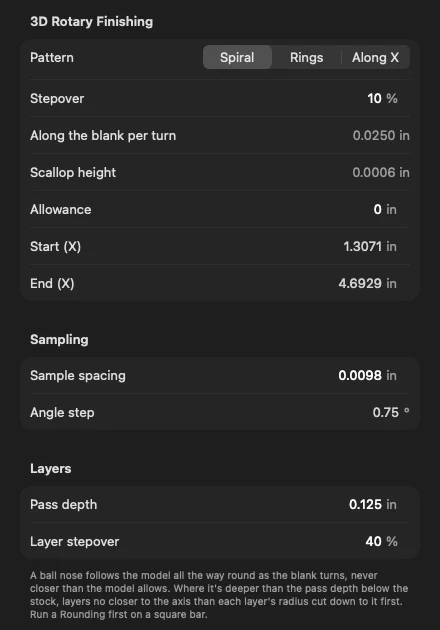
The finish's settings in the demo. - Pattern. Spiral, the default, is one continuous helix along the blank, a stepover per turn, with a full turn at each end. Rings makes a full turn at one place, then steps along the blank. Along X makes passes along the blank, stepping round between them, which is often quicker when the rotary is slow.
- Why Spiral: each ring ends where it started, at A0, and steps along the blank there, so all the steps line up and leave a faint seam along the part at A0. The spiral never stops moving along the blank, so there's no seam. On the pawn, both take about the same time.
- Stepover is shown as a length per turn and the scallop it leaves: 0.025 inch per turn and 0.0006 inch here.
- Allowance leaves material on the model. Start and End default to the model's ends, with the cutter kept inside the blank's.
- Sample spacing (along the blank) and Angle step (round it) set how closely the tool is dropped onto the model. It's an exact drop-cutter: the model is turned to each angle and the tool lowered onto it, and a move whose middle would dip into the model is split.
- Pass depth and Layer stepover set the layers cut first where the model is deeper than one pass.
Bull noses, V-bits, engraving bits and drills are followed just as exactly, each by its own shape. A flat end mill leaves material in hollows.
-
Set the turn speed and read the warning
Near the axis, cutting at full feed would need the blank to turn faster than the rotary can. So NativeCAM lowers the feed there to keep A within the machine's Turn speed, and Checks says how slow it gets, for the rounding and for the finish:
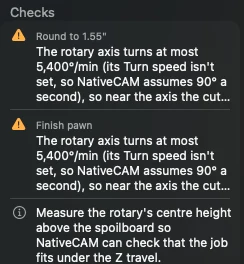
The A-rate warning on the demo, with no turn speed set. The rotary axis turns at most 5,400°/min (its Turn speed isn't set, so NativeCAM assumes 90° a second), so near the axis the cut slows to keep up: down to 14.7 in/min at 0.1574 in from the axis, from the 315.0 in/min set. If the wood burns there, lower the spindle speed.
The rounding gets the same warning: its feed comes down to 72.6 in/min at 0.775 inch from the axis, from the 273 in/min set.
The demo has no turn speed set, so NativeCAM assumes 90° a second and estimates the job at 22:08: 3:10 rounding and 17:55 finishing. Set Turn speed in the job's Rotary Axis settings to your A motor's velocity (see the indexed tutorial). It matters: at 10,800°/min, for example, the same job comes out at 11:38, and the slowest cut near the axis doubles to 29.5 in/min. Use your own machine's figure, not this one.
-
Simulate
Press ⌘R. The tool stays over the axis and the blank turns under it: first the rounding, then the layers and the spiral finish.
The finished pawn, still held by its stubs. The simulation runs at the estimate's pace, tool change included, so its clock ends at the same 22:08. Like the posted file, it stops the blank on the nearest whole turn at the end rather than winding it back to A0.
-
Post it
3D rotary finishing posts for Avid Mach4, LinuxCNC and grblHAL, on a driven A axis. Moves that turn the blank are fed in inverse time (
G93), each F worked out from the path the tool tip traces. On Avid, Z is zeroed on the rotation axis, not the top of the blank:(Material: Poplar rotary blank, round, D=1.7500, L=6.0000 in) (Z ZERO = CENTRE OF ROTATION {Avid: Rotary tab > Z Axis Touch}) (Y ZERO = AXIS CENTRELINE X ZERO = LEFT END OF THE BLANK) (Feeds: G93 inverse time on moves that turn A, G94 otherwise) ... (Toolpath: Round to 1.55in Tool: T1 1/4in Upcut End Mill) G00 Z1.3750 G00 X0.7500 Y0.0000 G00 A0.000 G00 Z0.9750 G93 G01 Z0.9250 A90.000 F50.2840 G01 Z0.8750 A180.000 F53.0742The setup sheet has a 3D rotary section saying what each finish follows and how (the pawn's). Projects with a 3D model on the blank or a 3D rotary finish are saved as format 7, which older builds won't open.
Then work through the checks at the top of this page: time a turn from MDI, set the turn speed, air-cut, and only then cut soft wood.


Limits. No rotary roughing yet, so deep material is cut in slow layers. The tool always points at the axis (no ball-nose offset in Y). The reach check compares the deepest cut with the bit's stickout rather than modelling the collet nut. Undercuts are reported but not shaded on the model. See known limits.