
Features
Everything between your drawing and the machine
NativeCAM covers the whole CAM step for a CNC router: import or draw the design, choose bits, make toolpaths, simulate them and export a checked file for your controller.
Design import
Draw rectangles, circles, ellipses, polygons, stars and text in any installed macOS font, or bring artwork in with ⌘I or by dropping files on the canvas.
- DXF: lines, arcs, circles, polylines with bulges, splines, ellipses, blocks and inserts, and
$INSUNITS. POINT entities become drill marks, and loose segments are chained into closed loops, layer by layer. Layers are kept: a file with several comes in as one shape per layer, already on that layer (a block's entities on layer 0 take the insert's layer). - SVG: the full path grammar, transforms and viewBox units. Layers are kept as for DXF: Inkscape layers by name, and the named groups straight under the root in files from Illustrator, Affinity and most other programs.
- PDF and Illustrator
.ai(PDF-compatible): nested groups, page rotation and the crop box. Clipping masks trim what they cover and hidden layers are left out, as a PDF viewer shows them. Visible layers are kept, one shape per layer. - 3D meshes: STL (binary or ASCII), OBJ, 3MF (including Bambu and Prusa multi-part files), USDZ/USD and PLY. Choose the up axis, flip, size, carve depth and how far below the surface the top sits.

Toolpaths
Select vectors, then add a toolpath from the toolbar or by right-clicking them. Toolpaths run in sidebar order: drag to reorder, or choose Toolpaths ▸ Optimize Run Order for the fewest tool changes that still cuts the inside of each part, chamfers on its edges included, before its cut-out. Neighbouring toolpaths that clear with the same bit first (rest-machined pockets, V-carve flat clearing) do all that clearing before changing to their own bits.
| Toolpath | What it does |
|---|---|
| Profile | Inside, outside or on the line; climb or conventional; multi-pass; ramp entry; arc or line leads in and out; dogbone or T-bone corners; tabs; allowance. Holes are cut before outside profiles. With Adjust feeds for load on, tight inside arcs slow so the edge keeps your feed (tutorial). |
| Offset or raster clearing, islands, safe feed links between regions, dogbone or T-bone corners. Inner clearing rings get rounded corners while the wall pass stays exact. Rest machining: a larger end mill clears the pocket first, and the pocket's own bit cuts only the corners and narrow parts it can't reach, then the walls (tutorial). With Adjust feeds for load on, the full-width first pass and the inside corners slow down and the rest runs at your feed (tutorial). | |
| V-carve | Maximal inscribed circles. A start depth to carve inside an existing pocket, and a flat depth measured down from it, as in Vectric VCarve. Flat areas are cleared by an end mill you choose or by the V-bit itself. Multi-pass. Inlay pockets and plugs. |
| Chamfer | A V-bit bevels the edges of closed shapes: outside, inside or both, with the vector as the bevel's top or bottom edge. Width and depth are linked through the bit's angle, and Sharp corners keeps hips and valleys crisp. With a profile on the same shapes it starts as a part's top edge, cut before the cut-out (tutorial). |
| Fluting | A ball nose, core box or V-bit cuts along open or closed vectors, ramping in and out at both ends, one end or neither, over a distance or a percentage, linear or smooth, in graduated passes. On a wrapped rotary job, flutes run round a column (tutorial). |
| Prism | A V-bit carves shapes as a raised bevel rising to a ridge along their middle. A full prism takes its depth from the shape; a shallower one leaves a flat top (tutorial). |
| Drill | Peck, chip-break and dwell, written as plain moves. |
| 3D roughing | Layered clearing with an end mill, leaving an allowance for finishing. Layer outlines follow the surface between grid samples instead of stepping cell by cell. |
| 3D finishing | Four strategies on an exact triangle drop-cutter, for every bit shape (ball, flat, bull nose, V-bit, engraving bit and drill). Raster rows follow the surface, with an optional cross-hatch at 90° in the same toolpath. Waterline cuts constant-Z loops from the top down, climb milled and fitted as arcs. Steep and shallow cuts waterline loops where the surface is steeper than the Steep angle (40° by default) and raster rows on the rest, overlapping past the seam with the same scallop either side. Pencil makes one pass along each concave crease with a smaller ball nose after the main finish. Smooth links bring the bit down in the air, not onto the model. Steep walls aren't gouged, and moves between samples are split wherever they'd dip into the part, so a wall's top edge isn't clipped either. Allowance is left square to the surface, except with a flat end mill. Shows the scallop height (tutorial). |
| Rotary | On faces: profile, pocket, drill, V-carve, chamfer, fluting and prism repeated at a list of index angles. Wrapped around: profile, pocket, V-carve, drill, chamfer, fluting, prism and spirals cut while the blank turns. Rounding turns a square bar round first, and 3D rotary finishing follows a 3D model all the way round (see below). |
Less time in the air. Between cuts the tool rises just above the material that's left plus a safe distance, feeds straight across short stretches already cleared, and rapids down to just above floors this job already cut. A rapid never moves sideways below the top of the material, and outside the drawn material nothing counts as already cut. Holes, loops and V-carve strokes are ordered by nearest neighbour, then improved by local search. Line segments are re-fitted to arcs, including helical arcs, for controllers that take them.
Feeds that follow the load. One feed for a whole toolpath has to suit its hardest cut. Turn on Adjust feeds for load on a profile or pocket and NativeCAM measures how much of the bit is cutting along the path. It slows the feed only where that's more than the toolpath's usual cut: full-width slots, inside corners, tight inside arcs. It never feeds faster than you set, never moves the path, and won't go below the chart's thinnest chip for the material; when that stops it, Checks suggests a lower spindle speed. The estimate, simulation and setup sheet use the scheduled feeds. It hasn't been calibrated on a machine, so it's off unless you turn it on.
Job checks as you work. Cuts into the spoilboard or a clamp, depth beyond flute length, toolpaths outside the work area, rapids through material, out-of-range feeds or RPM, chip loads too thin for the material (with a one-click recommended feed), a run order that cuts a part free too early, two different bits sharing one tool number, a pocket's clearance tool that's no larger than its own bit or that reaches the whole pocket anyway, a V-carve inlay plug that won't seat in its pocket, a chamfer that the profile on the same shapes would cut away or leave as a sharp lip, a chamfer, flute or prism deeper than the bit's V, corner reliefs that would cut into a part another toolpath cuts, and a run order that could save tool changes.


Leads and corner reliefs
Leads start and end each closed profile loop with a short arc or line in the waste, so the bit never plunges or stops against the finished edge. With a ramp entry the ramp runs down the lead. Leads stay on the waste side, on the material, clear of clamps and clear of parts other toolpaths cut, and shrink to fit small holes and tight gaps.
Corner reliefs cut just past each inside corner the bit can't reach, so square tenons, tabs and finger joints fit. A dogbone cuts along the corner's bisector; a T-bone cuts along one wall so the notch is only in the other, which suits slots about as wide as the bit.
A relief that would cut into a part another toolpath cuts, through a thin wall between two mortises, say, is left off and flagged, unless you choose to cut it anyway. Each relieved corner is circled on the canvas; click one to switch it between dogbone, T-bone either way, or none. Tutorial →

V-carve inlays
Carve a pocket in one board and a plug in a contrasting board from the same design and V-bit. The plug is mirrored for you and carved around the design so it stands proud; turned over, its walls meet the pocket's with a glue gap under its face. Pocket depth, glue gap and surface clearance follow Vectric's VCarve Inlay settings.
Checks warns when a plug won't seat in its pocket: a different V-bit, depths that don't match, no glue gap or clearance, a flat-tipped bit. The setup sheet lists each side's depths. A start depth on any V-carve also lets you carve inside an existing pocket. Inlays haven't been cut on a machine yet. Tutorial →
Changed for existing projects: a flat-bottomed V-carve with no clearance tool now has its flat cleared by the V-bit, so it exports different G-code than before.

Jobs bigger than the bed
When the material is longer or wider than the machine reaches, Job Setup ▸ Tiling cuts it in tiles: fed through in X or Y, or as a grid of individual tiles. Tile length and overlap are worked out from the machine's travel and the bits. A cut that crosses a tile line runs on into the overlap so it never breaks on the seam, and toolpaths that depend on an earlier one stay in order across tiles. For feed-through jobs, registration holes drilled into the spoilboard and through the board take dowels, so every move lines up exactly; Checks errors if a hole lands on the design, a cut, a part or a clamp. Export saves a file per tile with the same XY zero, and the setup sheet has a page per tile saying how far to move the board and where the dowels go. The simulation cuts the tiles in turn. Tiling hasn't been cut on a machine yet. Tutorial →
Toolpath templates
For the signs, boxes and cutting boards you make again and again, Toolpaths ▸ Save Toolpaths as Template… saves a job's toolpaths, in run order, with their tools and every setting, and optionally the job setup. Toolpaths ▸ Apply Template adds them to the next design. Each toolpath finds its vectors by layer, set shape by shape in the inspector, or by kind: text, circles, 3D models, open, closed or all vectors. One that finds nothing is added empty, and Checks says so. Profile, pocket and drill depths can be From top, Through (a set amount into the spoilboard) or Thickness − (leaving a set amount), so a template made on ¾ inch stock cuts ½ inch stock right. Tools are matched to your library by their geometry. The apply sheet shows what each toolpath finds and what a template's job setup would change, with a Z-zero change in orange. nativecam-cli template save and template apply do the same from the command line. Tutorial →
Rotary: on faces, wrapped around and 3D
On faces (indexed, 3+1). The blank turns to a fixed angle, the router cuts the face on top, then the blank turns to the next angle. Profile, pocket, drill, V-carve, chamfer, fluting and prism toolpaths list the angles they cut at, or Spread evenly fills in a number of faces. Round blanks take any angle; square bars take quarter turns. The posts turn the blank with G00 A at safe Z for Avid Mach4, LinuxCNC, grblHAL, Centroid and Buildbotics.
Turn by hand. Machines without a driven A axis (Grbl, FluidNC, Carbide Motion and Masso, or a hand-cranked indexer) can still cut indexed jobs: before each angle the program lifts to safe Z, stops the spindle and pauses with a comment such as "Turn the blank to 90°, then Cycle Start". Tutorial →
Wrapped around. The design sheet becomes the blank unrolled, as long as the blank and once round it high, and the blank turns while the router cuts: text around a rolling pin, flutes, and spirals for rope and barley twists. Profile, pocket, V-carve and drill toolpaths wrap, and moves that turn the blank are fed in inverse time (G93) for Avid Mach4, LinuxCNC and grblHAL. Rounding turns a square bar round, or a round blank down, before the rest of the job (tutorial). Wherever a cut would need the blank to turn faster than the rotary's turn speed, its feed comes down, and Checks says how far.
3D rotary finishing. A 3D model (a chess piece, a baluster, a table leg) lies along the rotation axis on the blank, and a ball nose follows it all the way round as the blank turns, from an exact rotary drop-cutter: a seamless spiral, rings, or passes along the blank. The feed comes down near the axis so the blank never has to turn faster than the machine's turn speed. There's no rotary roughing yet, so deep material is cut in slow layers; round the blank first. File ▸ New Demo Rotary Project (3D) opens a chess pawn. Tutorial →
Rotary output hasn't been verified on a machine yet: Mach4's G93 feeds and which way Avid's rotary turns are still untested, and neither rounding nor 3D rotary finishing has been cut. Indexed tutorial → · Wrapped tutorial →

Metal simulation and run times
The simulator is a Metal-rendered heightmap carved by the true shape of each bit (flat, ball, bull nose and V), with through-cuts, a tool marker, play, pause, scrub and speed control. It flags rapids through material.
Rotary jobs are carved on the blank itself. Indexed jobs turn to each angle with the tool at safe Z, as the machine will, and slow down for each turn so you can follow it. Wrapped jobs keep the tool over the axis while the blank turns under it.
Run times come from a model of the controller's own motion planner (per-axis acceleration, corner speeds, look-ahead depth, tool-change and spindle time, and each turn of a rotary blank), not distance divided by feed. Wrapped cuts are timed by the path of the tool tip, as their G93 feeds make them run. The simulation plays the job at the same pace, tool changes and the moves between toolpaths included, so its clock ends at the estimate. None of the estimates has been timed against a real machine yet.
The same simulator opens G-code and ShopBot files from other programs, with drilling cycles expanded, and tapping and boring cycles read the way your controller runs them. Tutorial → Tapping and boring →

Controllers and posts
NativeCAM writes each controller's own dialect, and the export checks hold every file to that controller's rules.
| Controller | Files | Status |
|---|---|---|
| Avid Mach4 | .tap | Run on a real machine |
| Grbl 1.1, grblHAL, FluidNC, Carbide Motion | .nc | From documentation and firmware source |
| LinuxCNC | .ngc | From documentation |
| Masso | .nc | From documentation |
| Centroid CNC12 | .cnc | From Avid's EX posts |
| Buildbotics | .nc | From documentation |
| ShopBot (OpenSBP) | .sbp | From ShopBot's command reference and vendor posts |
| RichAuto DSP | .nc | Conservative; its handling is undocumented |
| Anything else | The post's | With your own Vectric .pp |
For a controller NativeCAM has no post for, Use a Vectric Post… runs the .pp file your machine's maker publishes for VCarve or Aspire as a template, and compares its output with NativeCAM's own post before you use it. The project keeps its own copy; NativeCAM never ships or shares anyone's posts. Controller details → · Vectric post tutorial →
Export checks, air cuts and setup sheets
On export, NativeCAM reads back the file it's about to save and checks it before the save panel appears:
- Against the controller: units, line length, accepted codes, arc radii, feeds, tool numbers, dwell units, spindle on before cutting, a lift to safe Z after each tool change, no A moves for a controller without a rotary axis, no pause for a hand turn with the spindle running or the tool low, and the inverse-time (
G93) rules. - Against the toolpaths: every cutting move, arc, feed, dwell, tool and spindle speed, and on a rotary job the blank's angle and every inverse-time F, is compared with what the toolpaths asked for, which catches post bugs a toolpath simulation can't.
- Against the machine: the whole program, retracts and park included, is measured against the machine's travel and Z travel.
File ▸ Export Air Cut… (⌥⌘E) saves the same program with every Z raised, to run above the material first. File ▸ Export Setup Sheet… saves a printable page for the person at the machine: machine, material and zero, tools in loading order, the run order with tool changes and times, what each bit cuts in a rest-machined pocket, each V-carve inlay toolpath's side and depths, each chamfer, flute and prism, clamps and open checks. Example setup sheet
Machines and controller settings
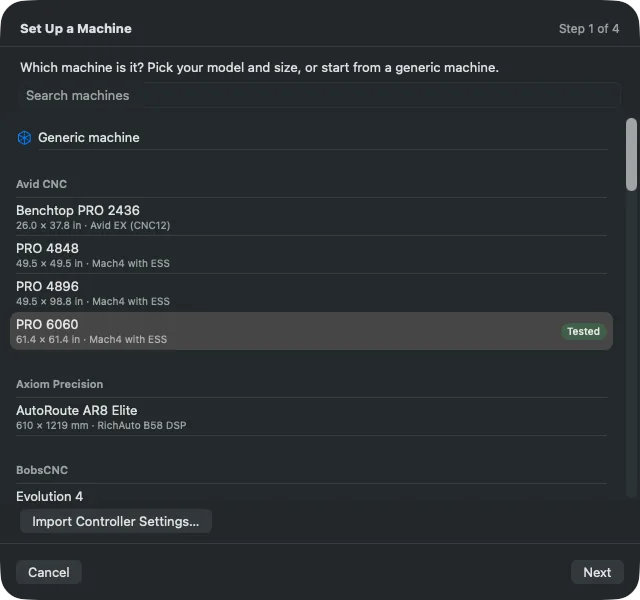
The catalogue holds 37 hobby and prosumer routers from 20 makers, each with the controllers it can run, its travel, spindle, speeds and defaults. Every value has a source: the maker's published specs, the controller settings the maker ships, or a labelled estimate.
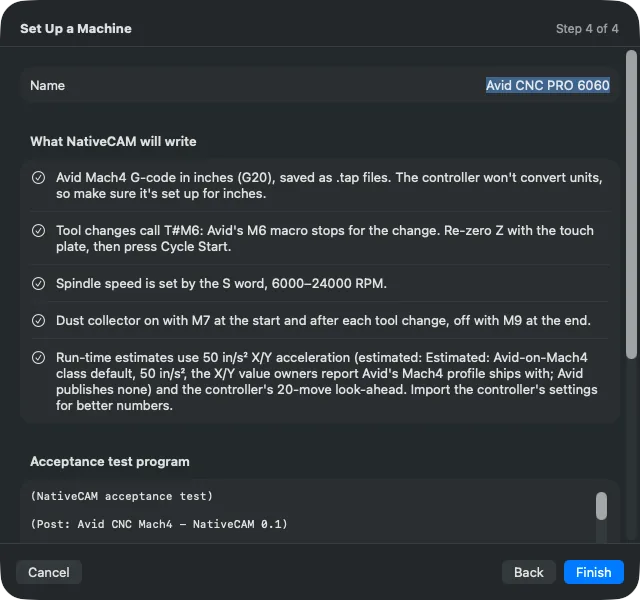
Set Up a Machine… walks through what forum threads show people getting wrong: which controller, which program sends the file, G-code units, tool changes, spindle and dust collector, ending with a plain-language summary and an acceptance test.
Import Controller Settings… reads a Mach4 Machine.ini, Grbl or grblHAL $ output, a LinuxCNC INI, a FluidNC config.yaml or a Fusion 360 .mch for your machine's real speeds, accelerations, travel and spindle range. You choose which values to apply, and each one records where it came from. Tutorial →
Tool library
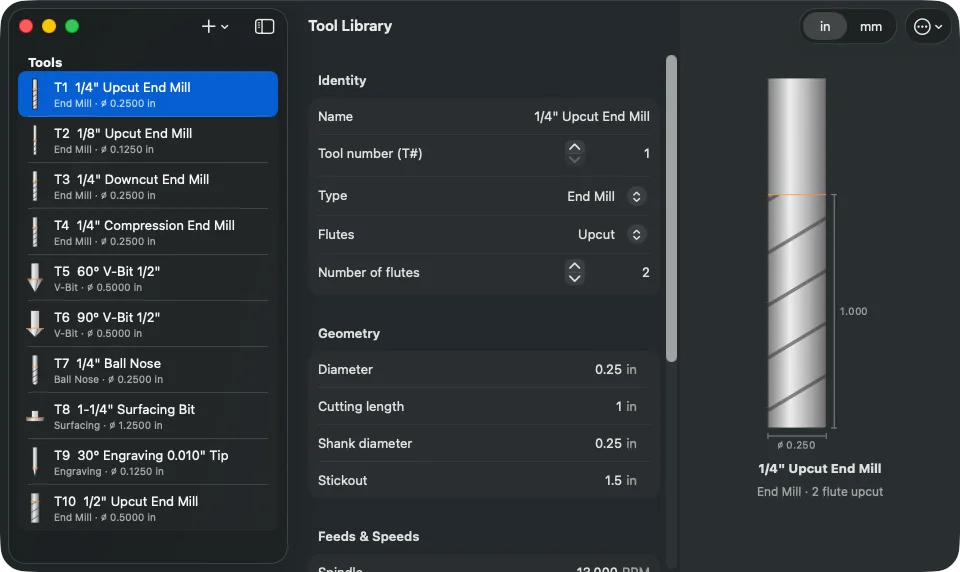
Flat, ball, bull nose, V-bit, engraving, surfacing and drill bits with full geometry: flute length, shank, stick-out, flute count and direction, feeds and speeds, and a chip-load calculator checked against chart values for the material. Compression bits get a first pass that clears the upcut length.
A new library starts with ten starter bits: ⅛, ¼ and ½ inch upcut end mills, ¼ inch downcut and compression end mills, 60° and 90° V-bits, a ¼ inch ball nose, an engraver and a surfacing bit. Their feeds and speeds put the chip load inside the chart for plywood and hardwood, with the feeds kept within 250 in/min. A library you've saved is never replaced, so it doesn't get new starter bits by itself: Tool Library ▸ ⋯ ▸ Add Missing Starter Tools adds the ones it doesn't have, keeping their T numbers where they're free and never changing a tool you have. Reset to Starter Library… replaces the whole library after asking, and keeps the old one as tools.json.bak.
Import Tools… reads Fusion 360 .tools and .json libraries, Vectric .vtdb files and NativeCAM's own JSON, listed by the library's folders so you can tick the bits you want. Values a library leaves out are read from the bit's name where possible, otherwise filled conservatively and marked ⚠.
Command line
nativecam-cli runs the same engine without the app, for scripting, CI and checking G-code from other programs:
nativecam-cli demo demo.nativecam                # write the demo sign (demo3d: 3D relief, new: empty project)
nativecam-cli post demo.nativecam -o demo.tap    # generate toolpaths, run checks, write G-code
nativecam-cli post demo.nativecam --air-cut 1 --sheet demo.html   # air cut 1" up, plus a setup sheet
nativecam-cli sim demo.nativecam --png out.png   # simulate and render the result as a heightmap
nativecam-cli sim other-cam-job.tap              # simulate G-code from any CAM program
nativecam-cli tools vendor.vtdb -o tools.json    # convert a Fusion 360 or Vectric tool library
nativecam-cli machine Machine.ini --apply job.nativecam    # read controller limits into a project
nativecam-cli template apply sign.nativecamtemplate new.nativecam   # add a saved toolpath set: writes "new + sign.nativecam"
nativecam-cli acceptance --controller grbl --units mm      # write the acceptance test for a controller
From the repository, run each as swift run -c release nativecam-cli …. post refuses to write a file when the job's checks or the file's find an error, unless you pass --force. On a wrapped rotary job, sim reports the volume removed all the way round the blank, and its PNG and heightmap show the sheet unrolled. Command-line reference →
A real Mac app
Document windows, real menus and keyboard shortcuts, undo, drag-and-drop import, trackpad gestures (pinch to zoom, rotate to spin the view), and Liquid Glass controls on macOS 26. Projects are plain JSON .nativecam documents; older builds refuse to open a format they don't know rather than silently writing the wrong G-code.
| Shortcut | Command | Shortcut | Command |
|---|---|---|---|
| ⌘I | Import | ⌘1 ⌘2 ⌘3 | Top, front, iso view |
| ⌘E | Export G-code | ⌘0 | Zoom to fit |
| ⌥⌘E | Export air cut | ⌥⌘I | Show or hide the inspector |
| ⌘R | Simulate | ⇧⌘T | Tool library |
| ⌘. | Stop simulation | ⌘D | Duplicate |
| ⇧⌘R | Recalculate all toolpaths |